The NOx sensor detects the level of nitrogen oxide in the exhaust gases. It is a component of the emissions control system. This article explains how to diagnose and replace a faulty NOx sensor in an E87 1 series BMW equipped with an N43 engine. It is probably mostly applicable to other similar models, including some 3 series. The sensor is reasonably accessible and so it is suitable for DIY replacement. Although, doing so is rather fiddly.
What does a Nox sensor do?
Modern BMWs are equipped with an on-board computer which controls the operation of the engine. This computer is known as the
DME. One of the roles of the DME is to reduce emissions of polluting gases and reduce fuel consumption by controling how fuel is injected into the engine. In order to do so, it relies on data supplied by many sensors. Several of these sensors are installed in the exhaust pipe and one of these is the NOx sensor.
The car's engine burns a mixture of fuel and air. By controlling the amount of fuel injected into the engine, the DME can vary the ratio of fuel to air. There exists an "ideal" ratio of air to fuel such that there is just enough air for the fuel to burn completely and no more. We call the air-fuel ratio λ (Lambda) and define a scale such that λ=1 is this "ideal" ratio. If the DME injects less fuel, such that the air-fuel ratio is higher (λ>1), then we say that the mixture is lean. If there is more fuel we say that it is rich; see
Air-fuel ratio (Wikipedia)
If the fuel mixture is rich, then there will be unburnt fuel present in the exhaust.
[1] If the mixture is lean, there will be oxygen present in the exhaust gases and these gases will be cooler. The engine will also deliver less power than when it is running at λ=1.
BMWs have very powerful engines. However, this power is only really useful when the car is accelerating hard or driving on the motorway. When driving is town or queuing in traffic, we only need a fraction of the power that the engine is capable of delivering. It is wasteful and causes unnecessary pollution to keep the engine running at λ=1 when we're not fully utilizing it. Therefore, in order to reduce fuel consumption and emissions, the DME orders a lean fuel mix.
[2]
Unfortunately, there is a problem caused by running a combustion engine at λ> 1. A side effect of the combustion of the fuel in the engine is that the intense heat causes nitrogen in the air to combine with oxygen to form various unstable compounds of nitrogen and oxygen: nitrogen oxides. These are hazardous to health
[5] and so their release into the atmosphere must be minimized. Fortunately, as these compounds are unstable, it is easy to break them down into harmless nitrogen and oxygen. This is the job of the catalytic convertor. However, a catalytic convertor operates most efficiently when the engine is running at λ=1; see
Catalytic converter (wikipedia). Far from this regime, the catalytic converter will be unable to break down nitrogen oxides. Thus, unless measures are taken, when the engine is running on a lean mixture to reduce fuel consumption and emissions, it will, in fact, increase emissions of nitrogen oxides.
In order to resolve this contradiction, the car is equipped with a second catalytic converter known as a NOx storage catalytic converter. This is capable of storing small amounts of nitrogen oxides during periods when they cannot be broken down. However, the capacity of the storage is limited. When it is full, the air-fuel mixture must be enriched again (λ=1).
The function of the NOx sensor is to alert the DME when the storage converter is full. The NOx sensor is installed just downstream of the storage converter. While the converter is filling, the concentration of nitrogen oxides downstream of the converter will be low. When it is full, they will rise. It is this rise in the concentration of nitrogen oxides that is detected by the NOx sensor. The sensor signals the DME which enriches the fuel mixture in order to decompose the nitrogen oxides; this is known as regeneration of the converter. Once this is complete, the engine can return to λ>1. This cycle repeats every minute or so depending on the signals received from the NOx sensor.
[3] The NOx sensor and the storage converter allow the engine to run with a lean mixture most of the time, with brief additional bursts of fuel when necessary to regenerate the storage converter.
What is the impact of driving with a broken NOx sensor?
Unfortunately, a broken NOx sensor seems to be quite a common fault. Unlike the other sensors of the emissions controls system, which are well protected within the engine compartment, the NOx sensor must be downstream of the storage converter and is, therefore, mounted on the exhaust pipe underneath and towards the rear of the car. It is probably this exposed position that means that failure of this sensor is relatively common.
Fortunately, the consequences of a broken NOx sensor are not serious and there is no urgency to perform a repair. For this reason, no warning light is displayed when the sensor fails. You would most likely only become aware of the problem if it were noticed during a routine service or if you are in the habit of checking the error codes from the OBD (Onboard Diagnostics System).
If the DME does not receive a signal from the NOx sensor, it will maintain the air-fuel mixture at close to λ=1 all the time, in order to ensure that nitrogen oxides are not emitted to the atmosphere. Therefore, fuel consumption and other emissions, for example CO2, will increase. Replacing a broken NOx sensor will, therefore, save you money on fuel and reduce the environmental impact of driving your car. On the other hand, a replacement sensor is quite expensive. You would need to decide for yourself whether a repair makes economic sense, or whether it would be cheaper to pay for the additional fuel.
How do I know if the NOx sensor is broken?
You might notice an increase in fuel consumption. However, to be sure you should connect a computer to the car's OBD port and read the error codes. The codes associated with a broken NOx sensor are shown below.
[4]
0x2AF6 0x2AF6 Stickoxidsensor, Lambda binär
P122F NOx-Sensor binärer Lambdasignalschaltkreis (Bank 1) - Kurzschluss
0x2AF2 0x2AF2 Stickoxidsensor, Lambda linear
P121F NOx-Sensor linearer Lambdasignalschaltkreis (Bank 1) - Kurzschluss
0x2AF4 0x2AF4 Stickoxidsensor, elektrisch
P122C NOx-Sensor Schaltkreis (Bank 1) - Kurzschluss
These mean that the sensor is short-circuited.
You might also see the following codes.
0x2AF9 0x2AF9 Stickoxidsensor, Nox-Signal: Schubprüfung
P127A NOx-Sensorsignal (Bank 1) - Signal zu hoch bei Schubprüfung
0x30DA 0x30DA Stickoxidsensor, Signal
P124D NOx-Sensorsignal (Bank 1) - nicht verfügbar im Betrieb
What do I need for the repair?
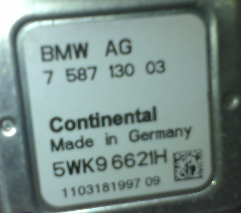 |
| Figure 1: Old NOx sensor control unit. |
No special equipment is required for the repair other than the NOx sensor itself. A NOx sensor, in fact, consists of the sensor itself and a paired control unit. This is a small computer that interprets the output of the sensor and sends digital signals to the DME via the
CAN bus. The NOx sensor used in an E87 with N43 engine is manufactured by Continental. There seem to be a variety of similar pairs of sensor and control unit produced by Continental and Siemans available. I do not know if it is, in fact, possible to fit a different sensor. To be certain, you should buy an OEM replacement part from BMW.
The part number for the sensor is: 1178 7 587 130. On the sensor itself this is followed by a two digit number that I believe to be a revision number. When the part is redesigned, this number will be increased to indicate that it is a new version of the same part. I'm aware of the existance of a version 5, so you probably wouldn't want to buy one that was older than that. There may be a more recent version available now or in the future. Figures 1 and 2 show the labelling on an old and a new control unit. Figure 3 shows the control unit with the sensor.
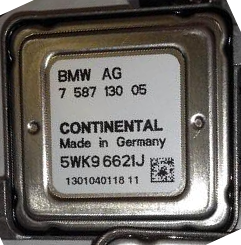 |
| Figure 2: New NOx sensor control unit. |
I believe it is possible to order a replacement part directly from BMW parts. Alternatively, new unused sensors are sometimes made available on eBay. Obviously, you should excercise your common sense when buying on eBay, as always.
 |
| Figure 3: The control unit and the sensor. |
Other than the sensor itself, you will need:
1) A set of socket spanners with a 3/4" or 1/2" driver and a 1/8" driver; the 1/8" driver is necessary for the bolts on the sensor control unit. There is not enough space between the unit and the drive shaft to use a larger driver.
2) 10mm and 8mm sockets to remove the heat shield that surrounds the exhaust pipe.
3) A T50 Torx socket to remove the reinforcement plate which covers the sensor.
4) A 22mm spanner to remove the sensor itself. You cannot use a socket, as the cable prevents you getting the socket onto the sensor. It is possible to buy a special 22mm oxygen sensor socket. However, I found it easier to apply the necessary torque with a normal spanner.
5) Some means of raising the back of the car; e.g. jacks or ramps.
6) You might need an oxygen port chaser, if the threads of the socket into which the sensors screws are damaged. However, with a fairly new car, this should not be necessary.
Repair instructions
YOU SHOULD TAKE ALL NECESSARY PRECAUTIONS BEFORE GETTING UNDER A RAISED CAR. IF THE CAR WERE TO FALL ON YOU, YOU WOULD VERY LIKELY BE KILLED OR SERIOUSLY INJURED. YOU SHOULD RESEARCH THIS POINT THOROUGHLY BEFORE ATTEMPTING ANY REPAIR WHICH INVOLVES RAISING THE CAR
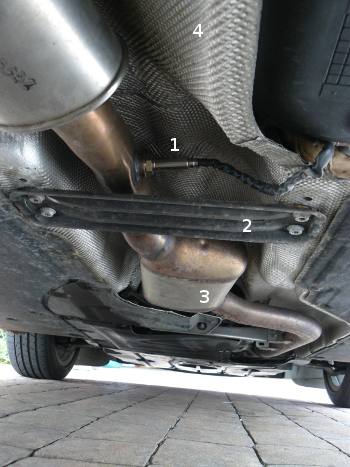 |
Figure 4: 1) NOx sensor; 2) reinforcement plate;
3) storage converter; 4) rear heat sheild. |
First of all raise the back of the car. The NOx sensor is located behind the reinforcement plate. The control unit is screwed to the base of the car behind the heat shield. It is important to see if you are able to unscrew the sensor. It can seize up and there is no point proceding further if you are unable to loosen it. Figure 4 shows the heat shield and reinforcement plate.
To gain access to the sensor, undo the four Torx bolts that secure the reinforcement plate. Having removed this, try to loosen the sensor using the 22mm spanner. You may have to apply quite a lot of torque to do so. I found it necessary to hold the spanner in place with one hand and apply force with a leg. Be careful not to cause damage to the exhaust system as you do so. If this doesn't work, you may want to try soaking with a rust release penetrant spray before trying again.
If you've managed to loosen the sensor, then you can proceed to drop the heat shield in order to gain access to the control unit. It is imposible, or at least extremely difficult, to remove the heat shield without first removing the exhaust pipe including both of the catalytic converters. I would not recommend doing so, as this would make the repair considerably more difficult and dangerous and would increase the risk of damaging the vehicle. However, it is possible to drop the heat shield just enough to be able to reach behind it and unscrew the control unit. To do so, Then use the 10mm socket to remove the dozen or so bolts that secure the rear heat shield. There are two such shields; there is no need to move the front shield. Most of the bolts that are securing the heat shield ressemble flying saucers. However, there are two normal looking bolts one at the back and one towards the front of the car. You will also need to use the 8mm socket to remove a multitude of small black bolts that hold the plastic covers on the bottom of the car. You do not need to remove these covers, but you do need to remove the securing bolts on either side of the exhaust pipe, where they overlap the heat shield. Otherwise, you will not be able to drop it.
Once you have removed all the bolts securing the heat shield, you should be able to drop it down so that it rests on the drive shaft. Next, follow the NOx sensor's cable to locate the control unit. This is hidden behind the heat shield. You will probably not be able to see it, but you should be able to feel it. You should be able to see some orange electrical cable inside a transparent protective sheath. This is the cable that connects the sensor to the
CAN bus.
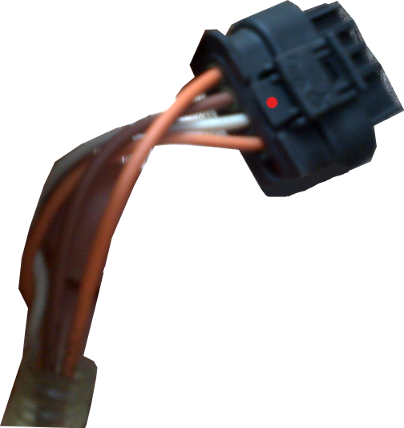 |
| Fig 5: Clip (red dot) on connector. |
The control unit is attached to the base of the car with two 8mm bolts at diagonally opposite corners. You will need to use a 1/8" driver to remove these bolts. There is very little clearance between the bolts and the drive shaft, and so a larger driver would not fit. Given the limited space and the fact that you cannot see what you are doing, it would not be easy with a normal 8mm spanner. Feel your way to place the socket on the bolts so that you can remove them. It would be advisable to wear something with long sleeves, as the sides of the heat shield are quiter abrasive and may cut into your arms otherwise. Once the bolts have been remove, you can slide the control unit around the heat shield, unclipping the orange cable from the base of the car as you go. Once you have the control unit out, you need to press on the clip (see Figure 5) in order to disconnect it.
Fitting the new unit is the same process in reverse. It's slightly harder than removing the old one, as you need to feel your way to place the new sensor onto the mounting bolts and to hold it there as you tighten the nuts. Remember to reattach the orange cable into its clips.
Finally, screw the sensor into the port on the exhaust pipe. Try not to twist its cable. This is quite easy to achieve as the sensor can be turned independently of its fixing nut until this it quite tight. A new OEM sensor will come with anti-seize compound already applied to its threads. However, if you have sensor without this, it would be a good idea to apply some to make it easier to undo if you ever need to remove it in the future.
Make sure you've applied a decent, but not excessive, amount of torque to ensure that the sensor is firmly attached. Put the heat shield back in place and all of the nuts and bolts that you removed. Finally, reinstall the reinforcement plate and make sure you've fully tighted the bolts that hold it in place. I believe this part is structrually important, so do make sure that the bolts have been properly tightened. The required torques are given in the
workshop manual. So, if you have a torque wrench, you should refer to these.
Finally, once everything is back in place, connect your computer to the car's OBD port and clear the error codes. Then, take it for a test drive and make sure that the NOx sensor error codes do not recur. Even better, ask somebody else to drive and monitor the output of the NOx sensor with the INPA software. When they are driving fairly gently, you should see the DME cycling between λ » 1 and λ ≈ 0.98 as the storage converter is regenerated. Also, when the driver brakes to slow down from a reasonable speed, when approach a junction, for example. You should see λ > 20, as the DME cuts the supply of fuel completely; there is no need to waste fuel when slowing down and the engine braking that results helps to slow the car down.
Notes
- In practice, when the engine is running under hard acceleration, it is necessary to use a slightly rich mixture in order to prevent "knocking"; that is, uneven detonations of the air-fuel mix and excessive heat that can damage the engine; see Air-fuel ratio (Wikipedia).
- If you connect a computer to your OBD you can observe the air-fuel mix while somebody else is driving your car; see article ....
- If you monitor the output of the NOx sensor while the car is driving in town, you will see that λ > 1 most of the time, but will drop to λ < 1 briefly every minute or so.
- Some cars are equipped with engine that are more than one exhaust pipe; for example, V configuration engines. In a car with two exhaust pipes, there would be a two NOx sensors. "Bank 1" in these error messages would refer to a failure of the sensor in the first pipe and "Bank 2" the one in the second. The N43
engine only has a single exhaust pipe and so there is only one sensor. Therefore, the bank number can be ignored.
- See Environmental Protection Agency.


